Code vs Data Driven Displacement
23/09/2021
Today we're going to cover one of the most important topics in animation programming - the problem of Code vs Data Driven Displacement - and I can already feel the shoulders of animation and gameplay programmers across the industry tensing - because this is a topic where a lot of people hold strong opinions.
But in my view, understanding the details is ultimately more important than the use of specific approaches as it means you can communicate properly with designers and animators about the choices they have and what those choices mean. And, ensuring animation is something they feel they have control over is what will ultimately bring the best results in the long run.
But what actually is the issue of code vs data driven displacement? Well, at a basic level, the issue of code vs data driven displacement comes down to this: how can we move a character around a game world in a way which is both realistic and responsive?
But first, given that the industry has so many different names for things related to this topic, I think it's good to define what we're going to be talking about up front:
Contents
- Definitions
- Simulation Bone
- Character Controller
- Synchronization
- Adjustment
- Clamping
- Be Creative
- Sliding and Foot Locking
- Move the Camera
- Web Demo
- Source Code
- Conclusion
Definitions
The Simulation Object
The first thing, which I like to call the Simulation Object, is a simple physical object (often a capsule or circle) which acts as a proxy for the character in the world and can interact with the rest of the physical game world as expected, such as colliding with walls and sliding along floors.
Generally, for player controlled characters, the simulation object is moved using some basic mapping from the gamepad to a desired velocity, often smoothed using a critically damped spring, which is tuned to ensure the movement of this object fits the responsiveness and speed of movements we would like for a character in our game.
Here you can see me moving the simulation object around this little world using the gamepad, colliding with walls, and tweaking some parameters to adjust the responsiveness and speed. While in this case the simulation object is controlled using a critically damped spring, the final movement of the simulation object can ultimately follow any logic you like (although generally does not rely on specific animation data - this is why we call it "code driven displacement"). For example, here is a little bit of code I use to convert the gamepad stick direction into a desired target velocity in the world space, allowing for separate speeds for forward, backward, and sideways movement:
vec3 desired_velocity_update(
    const vec3 gamepadstick_left,
    const float camera_azimuth,
    const quat simulation_rotation,
    const float fwrd_speed,
    const float side_speed,
    const float back_speed)
{
    // Find stick position in world space by rotating using camera azimuth
    vec3 global_stick_direction = quat_mul_vec3(
        quat_from_angle_axis(camera_azimuth, vec3(0, 1, 0)), gamepadstick_left);

    // Find stick position local to current facing direction
    vec3 local_stick_direction = quat_inv_mul_vec3(
        simulation_rotation, global_stick_direction);

    // Scale stick by forward, sideways and backwards speeds
    vec3 local_desired_velocity = local_stick_direction.z > 0.0 ?
        vec3(side_speed, 0.0f, fwrd_speed) * local_stick_direction :
        vec3(side_speed, 0.0f, back_speed) * local_stick_direction;

    // Re-orientate into the world space
    return quat_mul_vec3(simulation_rotation, local_desired_velocity);
}
The Character Entity
The second thing, which I like to call the Character Entity, is the actual position and rotation of the visual character which the player sees.
Rather than being moved around by simple logic such as that of a spring, we'd like our character to move around the world in the same way it did in the animation data, otherwise it's going to look like it's floating - with the feet sliding across floor. This movement according to the animation data is what we call "data driven displacement".
Here you can see a playback of some motion capture data from this repository, with the character entity position and rotation shown by the red point on the ground.
But hold on... given that this database only contains bone positions and rotations, where does this red position and rotation on the ground actually come from? Well, this leads us onto our first important topic: the Simulation Bone.
Simulation Bone
The Simulation Bone is an additional bone we add to animation data which represents the position and rotation of an imaginary simulation object relative to the rest of the character.
This can either be added manually, generated procedurally, or a mixture of the both. And, once found, we generally want to make this the root bone of the skeleton since it simplifies a lot of the code down the line.
The most important thing to keep in mind when dealing with the simulation bone is that if we want to achieve a minimal disconnect between the movement of our visual character and that of our simulation object, the simulation bone and the simulation object should have similar styles of movement: they should move at similar speeds, with similar rates of acceleration, deceleration, and turning.
So with that in mind, here is my little recipe for generating it procedurally: project one of the upper spine bones onto the ground and then smooth out its position using a Savitzky-Golay filter - use this as the position of the simulation bone. Then, take the forward direction of the hip bone, project it onto the ground, and smooth it out in the same way. Convert this into a rotation around the vertical axis and use this as the rotation of the simulation bone. Here we can see the result of this process visualized for some more walking data:
The idea behind this method is that the smoothing removes any small oscillations and changes in direction caused by the hips swinging back and forth; more closely matching the style of movements produced by a critically damped spring. However, be warned: the method I propose will often not produce good results if you apply it to looping animations or those already cut into small pieces. It works best for long takes which start and stop with a standing pose. My general advice is this: always examine and leave possible the ability to edit the generated simulation bone manually.
The simulation bone will be important later on for synchronizing the character entity with the simulation object, but for now it gives us a chance to do some analysis of our animation data to see how well it matches the style of movements of our simulation object.
For example, we can look at the previously shown long animation of an actor walking, as well as another long animation of a character running around (captured somewhat in the style of dance cards) and plot a selection of one second long trajectories of the simulation bone, starting at the origin, and oriented facing forward:
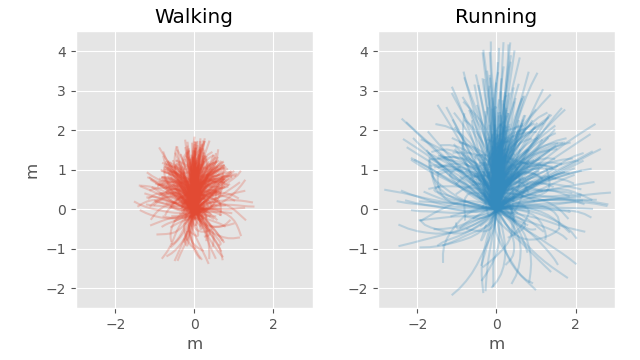
Here, each strand represents a different trajectory from the data, and gives us an idea of the kind of coverage our data has - what kinds of turns, strafes, and backward locomotion we have including the speeds of the different gaits.
Although this data is not particularly fast or responsive, if we look at these plots we can see that our running data has a max forward speed of just over 4 m/s, with a max sideways strafing speed of just under 3 m/s and a backward running speed of around 2 m/s. Similarly, for walking we can see a forward speed of about 1.75 m/s, sideways speed of around 1.5 m/s and backward speed of around 1.25 m/s.
It's also interesting to plot histograms of the simulation bone velocity, acceleration, and angular velocity. By looking at the maximum acceleration and angular velocity we can get a sense of how "responsive" our data is - how capable our actor was of accelerating and decelerating quickly. And by looking at the velocities themselves we can get a sense of the distribution of speeds in our data.

If we want to compare these plots to our simulation object we can make a recording of our simulation object moving around in many different ways (just like in the animation data), and plot the same properties to see if they look similar.
Here you can see (in fast forward) me moving the simulation object around to capture a range of movements like we have in our animation data. And here is what it looks like if I overlay the same statistics extracted from this simulation data on top of those from the animation data:
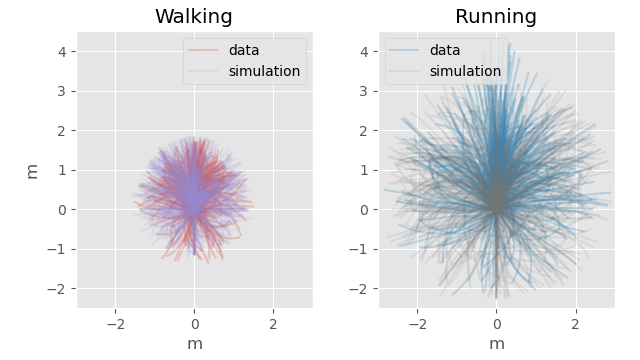
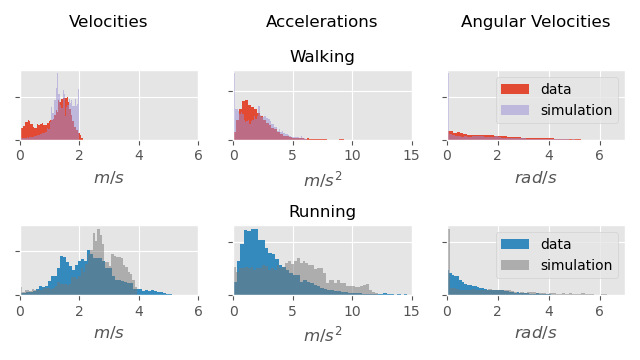
As you can see, the plots largely overlap, which means we have a fairly decent match between our simulation object behavior and the simulation bone of the character entity. This means that, given the animation data and simulation object settings we have, there is a good chance of achieving a good visual match between the movement of the simulation object and that of the character. But how does that actually work when we put things in game? Well first we need to build a character controller...
Character Controller
Although the issue of code-vs-data-driven displacement is fundamentally unavoidable no matter what style of character controller you build, to actually show some different methods of addressing it, I've set up a character controller using a very basic motion matching implementation somewhat in the favor of the motion matching system we presented in this paper. The full source code for this setup is available here.
And, although all the techniques I talk about here can be applied to character controllers of any style, when using motion matching there is a simple, yet somewhat ineffective way of solving this disconnect between the character entity and the simulation object - to just do nothing - to let the simulation object move according to its own code driven displacement and the character move according it its own data driven displacement.
Or to be a little more precise - by matching the future trajectory of the simulation object, relative to the current position and rotation of the character entity, the motion matching search will automatically try to find an animation which brings us back in sync with the simulation object's movement.
You can see this in action below, where the red points on the ground are the future trajectory of the animation matched by the motion matching system:
Notice how when the character drifts far from the simulation object the character tries to "catch up" by matching an animation going faster or slower.
Although a bit ineffective, I think this is a good example to show initially because it makes it obvious what things look like when we entirely disconnect the simulation object and the character entity and use our data to do the correction without thinking too much more about it.
Nonetheless, this solution alone is clearly not enough, and does not give a feeling of very precise control. Sometimes the character can drift far - clipping with walls or moving in an unpredictable way - making it difficult and frustrating for the player to get any sense of control or achieve any kind of precision.
If we want to do better, we need to (believe it or not) do more than nothing.
Synchronization
A more popular option is this: each frame we can directly translate and rotate the character entity so that it is always exactly in sync with the simulation object. You can see this in action here:
This gives a very direct, one-to-one feeling of control over the character - something you may recognize from many games. But unless our animation data matches the behavior of our simulation object extremely well, visually it is not going to look very good and may have a floaty, artificial feel with a lot of foot sliding or sudden spinning.
In fact, we may find ourselves tweaking our simulation object to move more smoothly - making it less responsive than we would like just to make our animation look a bit less absurd - which seems a bit counterproductive since the whole reason to synchronize these two things was for that feeling of responsiveness.
Another important thing to notice here is that responsiveness of the simulation object with respect to desired velocity and desired rotation are two entirely separate controls. And tweaking these both individually can have a huge impact on the quality of the animation. A common mistake seen in many games is to set the responsiveness of the desired rotation too high, causing the character to spin unrealistically on the spot while ultimately not bringing any more control in terms of positioning.
But depending on your game, the kind of result you see above might already be perfectly acceptable. For something arcadey, this direct feeling of control may be far more important than the realism of the animation system...
But assuming we do want something more realistic, we can also go entirely in the opposite direction, and directly translate and rotate the simulation object each frame to be in sync with the character entity instead.
This gives animation with very little foot sliding and a feeling of presence and weightiness, but unless the data you are using is very quick and snappy, chances are your character will still feel sluggish and slow to respond.
Naturally, we can also blend between these two methods by looking at the updated position each frame according to both the simulation and the animation data, blending between the two, and taking that as the final result to place both the character and the simulation.
And although this can work well, I tend to find this method kind of unsatisfactory - as it essentially boils down to trading off one constraint for another rather than doing something that satisfies both.
Part of this compromise is inevitable simply due to the impossible nature of character control in games: not only do video game characters move at super-human speed, but in real life we apprehend when we are going to stop or slow down in our heads which gives us time to prepare - but when playing a video game we move the stick at the exact instant we want our character to respond and react!
But this aside, is there anything we can do which is not such a direct trade-off between these two competing constraints?
Adjustment
Instead of directly translating our character entity to the simulation object every frame (or vice versa) here's another idea: let's allow our simulation object to move as it wants, and allow our character entity to move as it wants, but then smoothly apply some adjustment to bring the character entity back toward the simulation object over time. This allows some deviation between the two but means we don't have to compromise on the movement of our simulation object at all.
For example, we can use a damper to pull the character toward the simulation:
vec3 adjust_character_position(
    const vec3 character_position,
    const vec3 simulation_position,
    const float halflife,
    const float dt)
{
    // Find the difference in positioning
    vec3 difference_position = simulation_position - character_position;

    // Damp that difference using the given halflife and dt
    vec3 adjustment_position = damp_adjustment_exact(
        difference_position,
        halflife,
        dt);

    // Add the damped difference to move the character toward the sim
    return adjustment_position + character_position;
}
We can also formulate the same thing in terms of quaternions for adjusting the character rotation.
quat adjust_character_rotation(
    const quat character_rotation,
    const quat simulation_rotation,
    const float halflife,
    const float dt)
{
    // Find the difference in rotation (from character to simulation).
    // Here `quat_abs` forces the quaternion to take the shortest
    // path and normalization is required as sometimes taking
    // the difference between two very similar rotations can
    // introduce numerical instability
    quat difference_rotation = quat_abs(quat_normalize(
        quat_mul_inv(simulation_rotation, character_rotation)));

    // Damp that difference using the given halflife and dt
    quat adjustment_rotation = damp_adjustment_exact(
        difference_rotation,
        halflife,
        dt);

    // Apply the damped adjustment to the character
    return quat_mul(adjustment_rotation, character_rotation);
}
In these functions damp_adjustment_exact is essentially another variation of our damper code that damps a point starting at zero (or the identity rotation) moving toward the desired difference using a given halflife and dt.
#define LN2f 0.69314718056f

vec3 damp_adjustment_exact(vec3 g, float halflife, float dt, float eps=1e-8f)
{
    return g * (1.0f - fast_negexpf((LN2f * dt) / (halflife + eps)));
}

quat damp_adjustment_exact(quat g, float halflife, float dt, float eps=1e-8f)
{
    return quat_slerp_shortest_approx(quat(), g,
        1.0f - fast_negexpf((LN2f * dt) / (halflife + eps)));
}
The intuition here being that for adjustments we need to "restart" the damper from zero every time since we are applying the resulting adjustment directly to the thing we are adjusting. Here I am also using a quaternion slerp approximation taken from this fantastic blog post.
And this is how it looks in action:
Like before, rotational adjustment and positional adjustment can be applied separately and at different rates, and often we will want the rotational adjustment to be applied much more slowly since it has less of an impact on the feeling of responsiveness and tends to look bad when applied too aggressively.
This system of adjustment works pretty well, but if we are not careful it can introduce quite a lot of foot sliding which can look particularly awkward when the character is standing still or doing a plant-and-turn.
Here's an idea: let's limit the amount of adjustment we apply to some ratio of the total character velocity. This means we will only adjust the rotation when the character is already turning and only adjust the position when the character is moving fast.
vec3 adjust_character_position_by_velocity(
    const vec3 character_position,
    const vec3 character_velocity,
    const vec3 simulation_position,
    const float max_adjustment_ratio,
    const float halflife,
    const float dt)
{
    // Find and damp the desired adjustment
    vec3 adjustment_position = damp_adjustment_exact(
        simulation_position - character_position,
        halflife,
        dt);

    // If the length of the adjustment is greater than the character velocity
    // multiplied by the ratio then we need to clamp it to that length
    float max_length = max_adjustment_ratio * length(character_velocity) * dt;

    if (length(adjustment_position) > max_length)
    {
        adjustment_position = max_length * normalize(adjustment_position);
    }

    // Apply the adjustment
    return adjustment_position + character_position;
}
Like before we can also formulate this in terms of quaternions for the character rotation.
quat adjust_character_rotation_by_velocity(
    const quat character_rotation,
    const vec3 character_angular_velocity,
    const quat simulation_rotation,
    const float max_adjustment_ratio,
    const float halflife,
    const float dt)
{
    // Find and damp the desired rotational adjustment
    quat adjustment_rotation = damp_adjustment_exact(
        quat_abs(quat_normalize(quat_mul_inv(
            simulation_rotation, character_rotation))),
        halflife,
        dt);

    // If the length of the adjustment is greater than the angular velocity
    // multiplied by the ratio then we need to clamp this adjustment
    float max_length = max_adjustment_ratio *
        length(character_angular_velocity) * dt;

    if (length(quat_to_scaled_angle_axis(adjustment_rotation)) > max_length)
    {
        // To clamp convert to scaled angle axis, rescale, and convert back
        adjustment_rotation = quat_from_scaled_angle_axis(max_length *
            normalize(quat_to_scaled_angle_axis(adjustment_rotation)));
    }

    // Apply the adjustment
    return quat_mul(adjustment_rotation, character_rotation);
}
Here you can see this in action with a max_adjustment_ratio of 0.5:
Notice how much less apparent the adjustment is when looking at the feet - in particular during plant-and-turns and start-and-stops.
In general I like this solution, and although it still makes the character feel heavy, I think it adds a lot to the feeling of control to what is essentially data-driven displacement for the character.
But in many cases the residual deviation is just still too much, and more in-sync behavior is needed. What can we do in these cases?
Clamping
To fix the problem of the character drifting too far from the simulation we can clamp the character to some maximum deviation both in terms of distance and angle.
vec3 clamp_character_position(
    const vec3 character_position,
    const vec3 simulation_position,
    const float max_distance)
{
    // If the character deviates too far from the simulation
    // position we need to clamp it to within the max distance
    if (length(character_position - simulation_position) > max_distance)
    {
        return max_distance *
            normalize(character_position - simulation_position) +
            simulation_position;
    }
    else
    {
        return character_position;
    }
}
For the rotation the formulation is similar, but done in terms of a maximum angle.
quat clamp_character_rotation(
    const quat character_rotation,
    const quat simulation_rotation,
    const float max_angle)
{
    // If the angle between the character rotation and simulation
    // rotation exceeds the threshold we need to clamp it back
    if (quat_angle_between(character_rotation, simulation_rotation) > max_angle)
    {
        // First, find the rotational difference between the two
        quat diff = quat_abs(quat_mul_inv(
            character_rotation, simulation_rotation));

        // We can then decompose it into angle and axis
        float diff_angle; vec3 diff_axis;
        quat_to_angle_axis(diff, diff_angle, diff_axis);

        // We then clamp the angle to within our bounds
        diff_angle = clampf(diff_angle, -max_angle, max_angle);

        // And apply back the clamped rotation
        return quat_mul(
          quat_from_angle_axis(diff_angle, diff_axis), simulation_rotation);
    }
    else
    {
        return character_rotation;
    }
}
Where the quat_angle_between function is defined as follows (if you want an idea of why, think about how angle-axis decomposition is defined for quaternions):
float quat_angle_between(quat q, quat p)
{
    quat diff = quat_abs(quat_mul_inv(q, p));
    return 2.0f * acosf(clampf(diff.w, -1.0f, 1.0f));
}
This gives us a more reliable idea of what the max deviation will be, which can be very important for other elements of the game like network code or collision detection. This is what it looks like when combined with our previous velocity-clamped adjustment:
We can see it does a good job of limiting how far the character drifts, while still allowing the character to move naturally when inside the bound. And while this can sometimes make the character feel like they are being "dragged along" when pushed up against the boundary, there are plenty of controls here now for designers and animators to try and find the balance they are looking for.
Be Creative
Ultimately there is no one best solution to this problem and you may want to combine zero or more of these techniques as well as your own ad-hoc methods. Here, encouraging designers and animators to get involved in potential solutions is important as you might get a greater sense of what matters and what doesn't.
In this article I talk mostly about making the simulation object produce movements which match the animation data, but usually we will want to do things the other way around: editing our animation data to better fit our simulation object. There are many tricks that can be done here. For example - in this demo I speed up the motion capture data by about 10% to increase the max speed and responsiveness a little bit, as well as mirroring it to increase the coverage.
There are also completely different ways to develop your animation system that can make many of the fundamental problems much easier to solve. For example, we may want to describe animations in terms of foot contact locations and trajectories, and then generate animations which fit exactly the trajectories we want.
Finally, there are many little tricks that can increase the perception of responsiveness - such as adding some procedural look-at to make the character turn their head to face the desired direction of travel without any delay.
In terms of managing all the parameters and controls that need to be set, overall I like to take a data-centric view - letting animators and designers label regions of the animation data with the exact code-vs-data-driven displacement behavior they want. This gives them full flexibility and also scales better than embedding these settings in specific logic, states, or modes of the animation system.
Previously, motion matching and other data heavy or machine learning methods have been framed as fundamentally opposed to the fast and responsive code-driven control that is required by many games, but I don't see it like this.
By default motion matching does not blend animation data which means often it's difficult to achieve an exact desired velocity or turning angle without some correction. But at the same time, having a fluid, interruptible-at-any-point animation system which uses a lot of data can also mean you have a greater chance of finding a realistic animation that can achieve the desired movement of the character with minimal adjustment, visual weirdness, and data preparation.
Sliding and Foot Locking
Even the most sophisticated animation systems are not completely free from visual artifacts such as foot sliding. As a kind of last resort we can try to tackle these from the opposite direction - adjusting the animation at runtime to remove them.
Typically this is done with a combo of two things. First, finding the position of the foot when it comes into contact with the floor and locking this position in place until the contact ends. And second, using inverse kinematics to adjust the pose such that the foot stays at this locked position.
For the locking I like to use inertialization again. Here the logic is relatively simple. We take as input the position and velocity of the toe joint in the world space, as well as a flag saying if a contact is active or not. When the foot enters a contact state we use an inertializer to transition to a state where we feed as input just that fixed contact point (with zero velocity), then, when we release the contact we transition the inertializer back to just feeding it the animation data. We can also add an additional little heuristic which unlocks the foot until the next contact if the distance between the locked contact point and the animation data grows too large.
void contact_update(
    bool& contact_state,
    bool& contact_lock,
    vec3& contact_position,
    vec3& contact_velocity,
    vec3& contact_point,
    vec3& contact_target,
    vec3& contact_offset_position,
    vec3& contact_offset_velocity,
    const vec3 input_contact_position,
    const bool input_contact_state,
    const float unlock_radius,
    const float foot_height,
    const float halflife,
    const float dt,
    const float eps=1e-8)
{
    // First compute the input contact position velocity via finite difference
    vec3 input_contact_velocity =
        (input_contact_position - contact_target) / (dt + eps);
    contact_target = input_contact_position;

    // Update the inertializer to tick forward in time
    inertialize_update(
        contact_position,
        contact_velocity,
        contact_offset_position,
        contact_offset_velocity,
        // If locked we feed the contact point and zero velocity,
        // otherwise we feed the input from the animation
        contact_lock ? contact_point : input_contact_position,
        contact_lock ?        vec3() : input_contact_velocity,
        halflife,
        dt);

    // If the contact point is too far from the current input position
    // then we need to unlock the contact
    bool unlock_contact = contact_lock && (
        length(contact_point - input_contact_position) > unlock_radius);

    // If the contact was previously inactive but is now active we
    // need to transition to the locked contact state
    if (!contact_state && input_contact_state)
    {
        // Contact point is given by the current position of
        // the foot projected onto the ground plus foot height
        contact_lock = true;
        contact_point = contact_position;
        contact_point.y = foot_height;

        inertialize_transition(
            contact_offset_position,
            contact_offset_velocity,
            input_contact_position,
            input_contact_velocity,
            contact_point,
            vec3());
    }

    // Otherwise if we need to unlock or we were previously in
    // contact but are no longer we transition to just taking
    // the input position as-is
    else if ((contact_lock && contact_state && !input_contact_state)
         || unlock_contact)
    {
        contact_lock = false;

        inertialize_transition(
            contact_offset_position,
            contact_offset_velocity,
            contact_point,
            vec3(),
            input_contact_position,
            input_contact_velocity);
    }

    // Update contact state
    contact_state = input_contact_state;
}
Once we have this sliding-free toe location we can then compute the desired heel location and use something similar to this method of inverse kinematics to pin the foot in place.
In the video below I also do some additional little procedural fix-ups like preventing the foot from penetrating the ground plane and bending the toe when the foot comes in contact with the floor. Check the source code for the full details.
Here you can see this in action with the locked contact points drawn in pink:
In reality, although this method works well in this toy environment, it's a bit over-simplified for a full game, and you will probably need something a bit more complex to handle all the edge cases your game might throw at you. Like everything else mentioned, I think the important thing here is to understand the issues, be creative, and find a solution that works for you.
Usually foot locking is difficult to make look good, and so it's important to invest time in other approaches first. A little bit of foot sliding can often look much less weird than breaking the posing of the character badly. Plus, no amount of foot locking will be able to fix things like the (much worse looking) walk animation when the character is pushing up against a wall...
Move the Camera
It's only fair that I mention another technique many games use (usually when deadlines start to loom), which is simply to move the camera over the shoulder so the feet are not visible.
Look ma, no foot sliding!
Web Demo
If you want to have a play around with the demo from this article I've put together a web demo here. Warning: downloading all the data can take a minute or two and a gamepad is required.
Source Code
If you want to have a tinker with the demo from this article yourself, source code is available here. It uses raylib and raygui so you will need to install those first. Since it contains a very basic motion matching implementation in the flavor of the motion matching system presented in this paper it may also be useful as a reference for people looking at implementing this kind of technique.
Conclusion
I hope this article has made clear the issue of code-vs-data-driven displacement and hopefully seeded some creative ideas in your head. If you have cool ideas for solutions I'd love to hear them so don't hesitate to get in contact.